•Prepare your task bar to receive the Macro:
•Step 1:Go to your taskbar and right click on it.

(you can click on images to enlarge)
- Step 2: (Resurrecting the Quick Launch Tool bar)
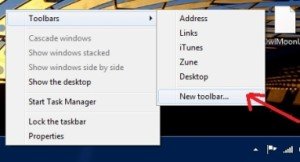
- Right-click on an empty part of the Taskbar to get the context menu as shown above. Unlock the Taskbar if it is locked and then navigate to the Toolbars => New Toolbar menu item.
- You will see the The “New Toolbar – Choose a folder” dialog box.
- Copy the green line below exactly as it is starting with %appdata
- %appdata%\Microsoft\Internet Explorer\Quick Launch
- and paste it as shown (1) then click the ‘select folder’ button (2).

- The Quick Launch tool bar should appear on the right side of the taskbar.


If you drag the Toolbar re-sizing handle (red arrow above) all the way to the left until it touches the start button, the entire Quick-Launch Toolbar will relocate and to the left side of the task-bar just like in windows XP.
Almost there.
Next right-click the Quick Launch bar and turn off the Show Text and Show Title options ; see below ;
You can also click on view and pick option for larger icons.

Step 3. Open CPRS (Load a test patient ).
Determine if you are classified a ‘Provider’ or not.

•Step 4 : Locate new encounter area, type in the Clinic Location and copy the entire line
(Right click , Copy) :

•Step 5 : Go to the Telephone Script Generator page.

Step 6 : In the notes tab click New note , locate or type in the name of the associated note title and copy it.

•Step 7 : back to the Telephone Script Generator page
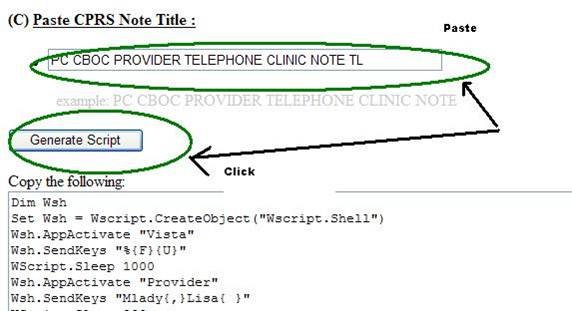
•Step 8 :
•Click Start button => Run => and paste the ENTIRE line on the script generator that starts with “Notepad.exe: Pick the 1st or 2nd line depending on your Operating system.


•Say YES to ‘create file ’. question

•Step 9: Copy entire generated script from the web-page and paste it into the empty notepad file you just created.

•Step 10 : save the script : Say Yes to save changes
•
Finally Done!
•Check your Quick Launch area for new blue ‘S’ shaped Icon:

•If visible, Installation was a successful.
•To test the script, Open CPRS , pick your test patient .

Go to the quick launch area and single-click on the Blue Icon.
Disclaimers/notes of caution:
•-The Macro was tested on a limited number of computers and there may be noticeable variability in performance from one to another.
•The following may cause it to malfunction:
–Older bloated computer
–Heavy multitasking
-Running the macro for the first time.
So, It’s a work in progress. Need ideas to improve.
Ideas are Welcome. You can post ideas or responses on this forum.